1. Kubernetes vs Istio Ingress
In this hands-on meetup exercise, we will take a look at various ways of exposing an application, both on Kubernetes and Istio. Then, we will see what kind of metrics have been gathered using observability toolsets like Envoy, Prometheus, and kiali.
| Chapter Details | |
|---|---|
| Chapter Goal | Expose an application using different methods of Kubernetes and Istio, then observe its metrics |
| Chapter Sections | |
Objectives
- Expose an Application using NodePort Service type
- Expose an Application using Kubernetes Ingress
- Deploy Istio on Kubernetes
- Expose an Application using Istio Ingress Gateway
- View the gathered metrics
1.1. Setup Environment
First let’s log-in to the lab environment and download some repositories.
Step 1 SSH in to the lab using your IP address, stack as username and b00tcamp as password:
user@laptop:~$ ssh stack@<IP-address>
password: b00tcamp
stack@lab:~$
Step 2 Check that you have Kubernetes system pods and ingress pods running in your environment:
$ kubectl get pods --all-namespaces
NAMESPACE       NAME                                    READY     STATUS
ingress-nginx   ingress-api-kzcrb                       1/1       Running
ingress-nginx   ingress-error-pages-57d884f788-2kfst    1/1       Running
kube-system     calico-node-hrgx2                       2/2       Running
kube-system     coredns-78fcdf6894-8nxwq                1/1       Running
kube-system     coredns-78fcdf6894-m7n5p                1/1       Running
kube-system     etcd-lab                                1/1       Running
kube-system     kube-apiserver-lab                      1/1       Running
kube-system     kube-controller-manager-lab             1/1       Running
kube-system     kube-proxy-cgzlk                        1/1       Running
kube-system     kube-scheduler-lab                      1/1       Running
kube-system     kubernetes-dashboard-5dd89b9875-clcf8   1/1       Running
kube-system     metrics-server-599b9f45df-pvlq4         1/1       Running
kube-system     tiller-deploy-58c64c4656-gxpfb          1/1       Running
nfs             nfs-provisioner-65dd4b6f87-4fw7r        1/1       Running
Step 3 Download the istio repository from Mirantis training:
$ git clone https://git@bitbucket.org/mirantis-training/istio.git
This repository contains manifest and config files that we will use throughout the hands-on portion of the meetup. Please feel free to clone this repository to your personal machines as well if you would like to run it again at another time.
Your environment is a single-node Kubernetes deployment running on Amazon’s EC2. See the following diagram for reference:
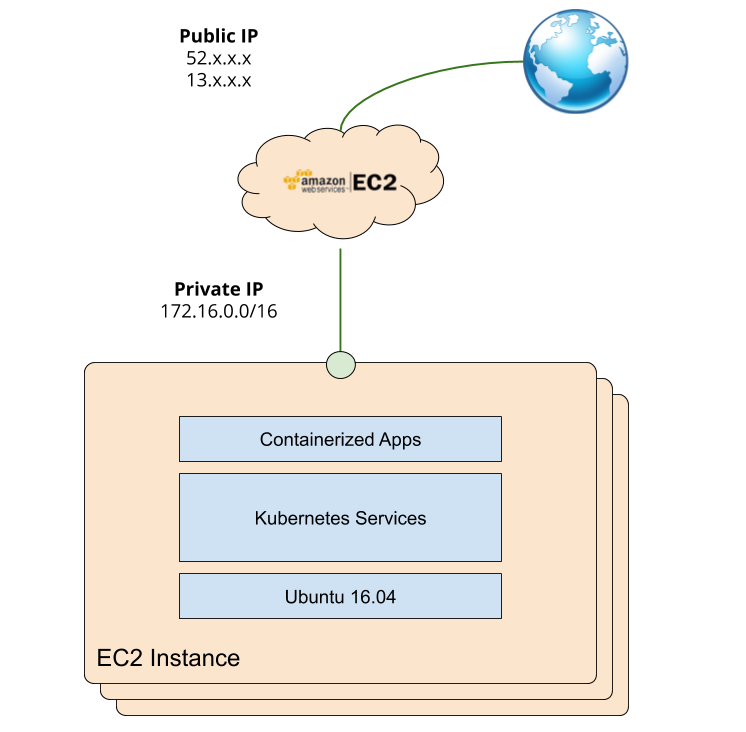
Throughout this exercise you will be asked to access your application or Kubernetes services from your browser. This means you will want to utilize the Public IP address you received to navigate to your VM:Port. Once EC2 forwards your request to your virtual machine, IP table rules will forward your request to the corresponding application Pod.
Going forward, note that the “NodePort” refers to the port space in your host machine; thus it can be reached via “localhost” within the lab, or via Public IP address outside of the lab.
If you have any further questions, please ask the presenter about the setup of the lab environment.
1.2. Expose App using NodePort
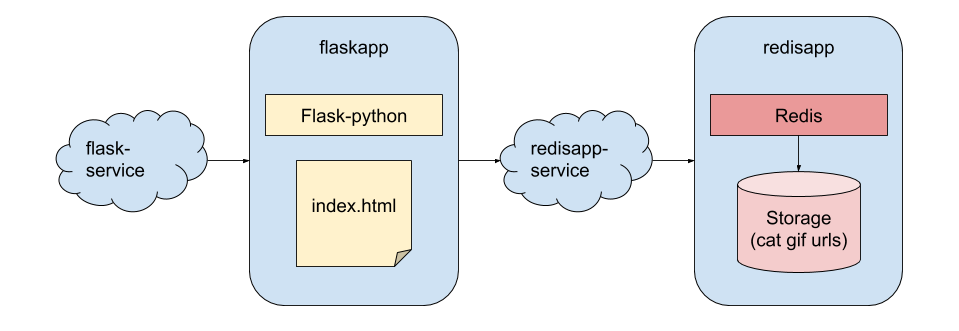
The Application we will be using is a simple Flask <-> Redis Cat Gif application. See the below diagram for the overview:
Step 1 First, create a configMap with the custom redis.conf file:
$ cd ~/istio
$ kubectl create configmap redisapp-config --from-file config/redis.conf
This configuration will be mounted to the Redis container
Step 2 Apply the redisapp-deployment.yaml manifest to create a single pod deployment of Redis:
$ kubectl apply -f ~/istio/kube-manifests/redisapp-deployment.yaml
Step 3 Verify that the Redis Pod Status indicates it is Running:
$ kubectl get pods
NAME                                       READY     STATUS    RESTARTS   AGE
pod/redisapp-deployment-5f9f9ccdbb-t4fkt   1/1       Running   0          1h
Step 4 Apply the flaskapp-deployment.yaml manifest to create a three replica deployment of Flask:
$ kubectl apply -f ~/istio/kube-manifests/flaskapp-deployment.yaml
Step 5 Verify that the Flask and Redis Pod Statuses indiate they are Running:
$ kubectl get pods
NAME                                   READY     STATUS    RESTARTS   AGE
flaskapp-deployment-58bcf784fd-2krw7   1/1       Running   0          1h
flaskapp-deployment-58bcf784fd-7tgjf   1/1       Running   0          1h
flaskapp-deployment-58bcf784fd-fb4mq   1/1       Running   0          1h
redisapp-deployment-5f9f9ccdbb-t4fkt   1/1       Running   0          1h
Notes
Note that the yaml specs contain both Service and Deployment declarations, take a look at these files if you are interested
Step 6 Obtain your NodePort associated with the flask-service and save it in an environment variable called NODEPORT:
$ NODEPORT=$(kubectl get svc flask-service -o jsonpath={..nodePort})
Step 7 Obtain the full address of your NodePort exposed application <Public-IP>:<NodePort>:
$ echo $PublicIP:$NODEPORT
<Public-IP>:<NodePort>
Copy this line and paste it in a browser of your choice. What do you see?
If you see CAT GIF OF THE DAY with a randomly assigned Cat gif, you have successfully exposed your application using NodePort!
Was that exciting? Probably yes if this was your first time hands-on with Kubernetes. But we can go a lot further than that even in our simple lab environment.
1.3. Expose App using Kubernetes Ingress
Next, we will use an Ingress rule to expose our app on port 80.
Step 1 Check that you have an Ingress controller and a default backend pod running:
$ kubectl get pods -n ingress-nginx
NAME                                       READY     STATUS    RESTARTS   AGE
pod/ingress-api-kzcrb                      1/1       Running   0          1d
pod/ingress-error-pages-57d884f788-2kfst   1/1       Running   0          1d
Step 2 Apply the ingress-flask.yaml manifest to configure the ingress controller to forward traffic to / from any host to the flask-service on port 80:
$ kubectl apply -f ~/istio/kube-manifests/ingress-flask.yaml
Step 3 Verify that the Ingress resource has been applied and that it has an ADDRESS assigned:
$ kubectl get ing
NAME            HOSTS     ADDRESS       PORTS     AGE
flask-ingress   *         172.16.1.27   80        1h
(Yes, ing is ingress for lazy people, just like po is short for pods)
Step 4 Open a browser and navigate to your Public-IP address on the standard port 80 (no need to specify the port). Your browser will probably complain with a “Safety Warning” of an unfamiliar page, you can click Advanced > Proceed to site in this case.
Once you land on the page, you should see the Cat gif of the day again.
Step 5 Lastly, see what fields are available for the rules in the ingress resource:
$ kubectl explain ingress.spec.rules
As you can see, Ingress allows us to do basic host / path based forwarding, fulfilled by a controller deployed separately. In our lab, the controller was deployed for you beforehand.
Keep this in mind as we go to the next section and explore Istio and its Ingress Gateway features.
Step 6 Clean-up the Ingress resource and the controller; we won’t need these anymore!:
$ kubectl delete ing flask-ingress
$ kubectl delete ns ingress-nginx
Notes
If you have not noticed yet, kubectl has tab-completion enabled. It is one of the most capable tab-completions ever seen in CLI so go ahead and try it out!
1.4. Deploy Istio on Kubernetes
One of the great things about Istio (and Kubernetes extensions / addons in general) is that it’s incredibly easy to get up and running as long as you have a Kubernetes environment.
In our case, we already have workloads running in the default namespace in “pure” Kubernetes. In this section, we will deploy Istio in the istio-system namespace, then enable automatic sidecar injection in the default namespace.
Once you restart the Pods in the default namespace, the sidecar Envoy proxies are injected to each Pod, and Istio is now in full effect! Let’s proceed with the installation.
Step 1 Download Istio 1.1.9 source code on the node:
$ curl -L https://git.io/getLatestIstio | ISTIO_VERSION=1.1.9 sh -
Step 2 Navigate to the istio-1.1.9 directory and initialize Istio using Helm:
$ cd ~/istio-1.1.9
$ helm install install/kubernetes/helm/istio-init \
   --name istio-init --namespace istio-system
This helm chart utilizes Pods which run to completion to initialize Istio related Custom Resources.
Step 3 Start up the Istio services:
$ helm install install/kubernetes/helm/istio \
 --name istio --namespace istio-system \
 --values install/kubernetes/helm/istio/values-istio-demo.yaml \
 --set \
 gateways.istio-ingressgateway.type=NodePort,kiali.enabled=true,prometheus.enabled=true,tracing.enabled=true,grafana.enabled=true
Step 4 Verify that the Istio related Pods are Running (or Completed in the case of init-crd Pods:
$ kubectl get pods -n istio-system
NAME                                      READY     STATUS      RESTARTS   AGE
grafana-55cd86b44c-mmk7f                  1/1       Running     0          3m
istio-citadel-f77d65ffd-jrkn6             1/1       Running     0          3m
istio-egressgateway-7f9cf698cf-42nnf      1/1       Running     0          3m
istio-galley-77b8f8b87-p284b              1/1       Running     0          3m
istio-ingressgateway-85ff498b54-nlpb7     1/1       Running     0          3m
istio-init-crd-10-cxv45                   0/1       Completed   0          12m
istio-init-crd-11-d6l6d                   0/1       Completed   0          12m
istio-pilot-fb85b46f4-mrjvw               2/2       Running     0          3m
istio-policy-78c86bbcb6-tfqvt             2/2       Running     2          3m
istio-sidecar-injector-57cdf6b889-tq4ws   1/1       Running     0          3m
istio-telemetry-6587f7564b-t2j9x          2/2       Running     3          3m
istio-tracing-7454db9d79-qt8zk            1/1       Running     0          3m
kiali-66d74fc6cc-72k85                    1/1       Running     0          3m
prometheus-7d9fb4b69c-pvfqb               1/1       Running     0          3m
Step 5 Finally, label the default Kubernetes namespace with istio-injection=enabled. Istio will interpret this as a cue to launch all Pods in this namespace with the Envoy sidecar proxy:
$ kubectl label namespace default istio-injection=enabled
Step 6 For the sidecar injection to take effect, you should restart Pods which existed before labeling the namespace. Since all our Pods are controlled by a replica set, we can delete all the Pods, and the Replica Set Controller will restart them:
$ kubectl delete pods --all
Step 7 Verify that the Pods have been restarted with 2 containers:
$ kubectl get pods
NAME                                   READY     STATUS    RESTARTS   AGE
flaskapp-deployment-58bcf784fd-dh57p   2/2       Running   2          3m
flaskapp-deployment-58bcf784fd-dsj5b   2/2       Running   2          3m
flaskapp-deployment-58bcf784fd-znngq   2/2       Running   2          3m
redisapp-deployment-5f9f9ccdbb-s8tpf   2/2       Running   0          3m
You can see that under the READY column, we have 2/2 containers running per Pod.
Important
If you choose not to use Istio for your application dataplane, you can skip the section on labeling namespace altogether. Istio Ingress will still be able to forward traffic to your Kubernetes services using its domain name; if you are curious, “unlabel” your default namespace and restart your pods. Then proceed to the next section.
Congratulations! You have succesfully installed Istio and enabled your workload to utilize Envoy proxy. Easy right?
1.5. Expose App using Istio Ingress Part 1
As you have learned from the presentation, utilizing an Istio Ingress requires three components:
- Ingress Gateway (Pod)
- Virtual Service (Custom Resource)
- Gateway (Custom Resource)
By deploying Istio in the earlier section, you have deployed the Istio Ingress-gateway already. Before using it as-is let’s first make a small modification to the Ingress-gateway Pod to accept connections from the Host Port 80.
In this section (Part 1) We will create these resources to demonstrate how to replicate the same ingress behavior as the nginx-ingress we created in Kubernetes before. In Part 2, we will demonstrate a more realistic example.
Step 1 Edit the (live) Pod manifest of istio-ingressgateway Pod:
$ kubectl edit -n istio-system deployment istio-ingressgateway
< Opens vim text editor with the spec >
Step 2 Scroll down to .spec.template.spec.containers.ports.containerPort:80 section and add hostPort: 80
spec:
...
  template:
  ...
    spec:
    ...
      containers:
      ...
        ports:
        ...
        - containerPort: 80
          protocol: TCP
          hostPort: 80          # Add this line
Once you have added the line hostPort: 80, save and quit the file.
Step 3 Verify that the istio-ingressgateway Pod is in the RUNNING state:
$ kubectl get pods -n istio-system -l app=istio-ingressgateway
NAME                                   READY     STATUS    RESTARTS   AGE
istio-ingressgateway-5d8ff9fb4-bvlmw   1/1       Running   0          1m
Any traffic sent to the host-IP:80 will now be handled by the istio-ingressagateway Pod.
Step 4 Create the Gateway Resource with the following spec:
$ AWSHOST=$(curl http://169.254.169.254/latest/meta-data/public-hostname)
$ cd ~
$ cat <<EOF > flask-gateway-http.yaml
apiVersion: networking.istio.io/v1alpha3
kind: Gateway
metadata:
  name: flask-gateway
spec:
  selector:
    istio: ingressgateway
  servers:
  - port:
      number: 80
      name: http
      protocol: HTTP
    hosts:
    - "$AWSHOST"
EOF
Gateway allows us to select on which gateway to use; for our example, it is the istio-ingressgateway created previously. We have also specified the valid hosts / ports to expose.
The environment variable AWSHOST represents ec2 assigned domain name for your virtual machine that is reachable from the internet.
Step 5 Create the Gateway resource:
$ kubectl apply -f ~/flask-gateway-http.yaml
Step 6 Create the Virtual Service Resource with the following spec:
$ cat <<EOF > flask-vs-http.yaml
apiVersion: networking.istio.io/v1alpha3
kind: VirtualService
metadata:
  name: flask-vs
spec:
  hosts:
  - "$AWSHOST"
  gateways:
  - flask-gateway
  http:
  - route:
    - destination:
        host: flask-service
        port:
          number: 80
EOF
In this definition, we define a virtual service which forwards all received traffic from AWSHOST to flask-service on port 80. This virtual service is associated with the flask-gateway created from the prior steps.
Step 7 Verify that the VirtualService custom resource is created succesfully:
$ kubectl get vs
NAME       GATEWAYS          HOSTS                                                AGE
flask-vs   [flask-gateway]   [ec2-13-57-15-201.us-west-1.compute.amazonaws.com]   2s
Step 8 Test your gateway by running curl on the AWSHOST:
$ curl $AWSHOST
<html>
 ...
 <body>
   <h4>Cat Gif of the day</h4>
   ...
 </body>
</html>
Awesome! You have used Istio Ingress to expose your application!
1.6. Expose App using Istio Ingress Part 2
We promised that Istio gateways are more featureful than pure Kubernetes Ingress. So let’s do a more meaningful example.
This time, we will deploy a Dog Gif of the day for Dog lovers. Through your intense market research, your team has concluded that Chrome browser users are more likely to be drawn to dogs than cats. You want to take advantage of this and expose a Dog gif application for Chrome users, and Cat gif application for everyone else.
Let’s see how this can be done using Istio.
Step 1 Launch the Dog application!:
$ kubectl apply -f ~/istio/kube-manifests/flaskapp-deployment-dog.yaml
Step 2 Ensure that Dog Pods are running:
$ kubectl get pods -l app=flaskapp-dog
NAME                                       READY     STATUS    RESTARTS   AGE
flaskapp-dog-deployment-86bdcb485c-c2tvv   2/2       Running   0          36s
flaskapp-dog-deployment-86bdcb485c-lbxqq   2/2       Running   0          36s
flaskapp-dog-deployment-86bdcb485c-vn6mc   2/2       Running   0          36s
Step 3 Delete the existing VirtualService from earlier:
$ kubectl delete vs flask-vs
Step 4 Create a new VirtualService definition with the following spec:
$ cat <<EOF > cat-dog-vs.yaml
apiVersion: networking.istio.io/v1alpha3
kind: VirtualService
metadata:
  name: dog-chrome-vs
spec:
  hosts:
  - "$AWSHOST"
  gateways:
  - flask-gateway
  http:
  - match:
    - headers:
        user-agent:
          regex: .*Chrome.*
    route:
    - destination:
        host: flask-dog-service.default.svc.cluster.local
        port:
          number: 80
  - route:
    - destination:
        host: flask-service.default.svc.cluster.local
        port:
          number: 80
EOF
The new VirtualService uses regex on the HTTP header to look for the key-word Chrome in the user-agent field. Then it will forward this particular request to the flask-dog-service (Service’s FQDN used in this example).
All other requests will be sent to the flask-service.
Step 5 Apply the manifest:
$ kubectl apply -f cat-dog-vs.yaml
Step 6 Obtain your AWSHOST environment variable and paste the domain name into a Chrome browser:
$ echo $AWSHOST
ec2-xy-xy-xy-xyz.us-west-1...

Note: Your dog gif may be different
Step 7 Check the link on other types of browsers and verify that you receive the Cat gif of the day.
Notes
This method does not work on mobile because user-agent header field for mobile browser is different than that of a desktop.
Fantastic! just with a few lines of resource definition, we can control the ingress endpoint and its forwarding behaviors. This is just the beginning of a set of features available to Istio’s Ingress gateway. To find out more, visit: https://istio.io/docs/tasks/traffic-management/ingress/
1.7. View Metrics [Optional]
One of the powers of having an Istio service-mesh is being able to visualize your microservices application. Let’s see what features are available to us already with the existing Istio / cat gif application.
We will use a UI tool called Kiali to visualize our data.
Step 1 Create a Password for the Kiali dashboard using Kubernetes Secrets:
$ cat <<EOF | kubectl apply -f -
apiVersion: v1
kind: Secret
metadata:
  name: kiali
  namespace: istio-system
  labels:
    app: kiali
type: Opaque
data:
  username: YWRtaW4=
  passphrase: YWRtaW4=
EOF
The username and passphrase are base64 encoded with value of admin / admin respectively.
Step 2 Restart the Kiali Pod to use the Secret:
$ kubectl delete pod -n istio-system -l app=kiali
Step 3 Ensure the Kiali Pod has restarted and is in a RUNNING Status:
$ kubectl get pod -n istio-system -l app=kiali
NAME                     READY     STATUS    RESTARTS   AGE
kiali-66d74fc6cc-2jzz7   1/1       Running   0          1m
Step 4 Edit the kiali service to service type NodePort so we can access it from the internet:
$ kubectl edit svc -n istio-system kiali
spec:
...
  type: NodePort          # Ensure type: NodePort
Save and quit the file when finished.
Step 5 Construct the URL for Kiali dashboard and open the link in the browser:
$ KIALIPORT=$(kubectl get svc -n istio-system kiali -o jsonpath={..nodePort})
$ echo $PublicIP:$KIALIPORT/kiali
Note that Kiali UI is available at <IP>:<Port>/kiali
Once you navigate to the URL it should appear as the following:
Step 6 Log-in to kiali using the credentials admin / admin
Step 7 We will focus on the Graph view for this demo, on the left hand navigation bar, click Graph:
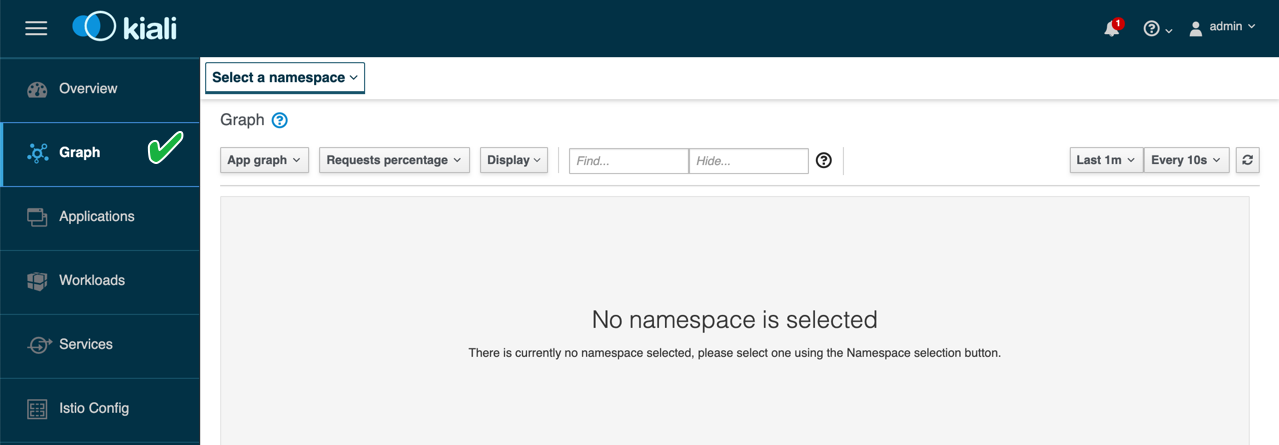
Step 8 From the top drop-down menu labeled Select a namespace, choose default:
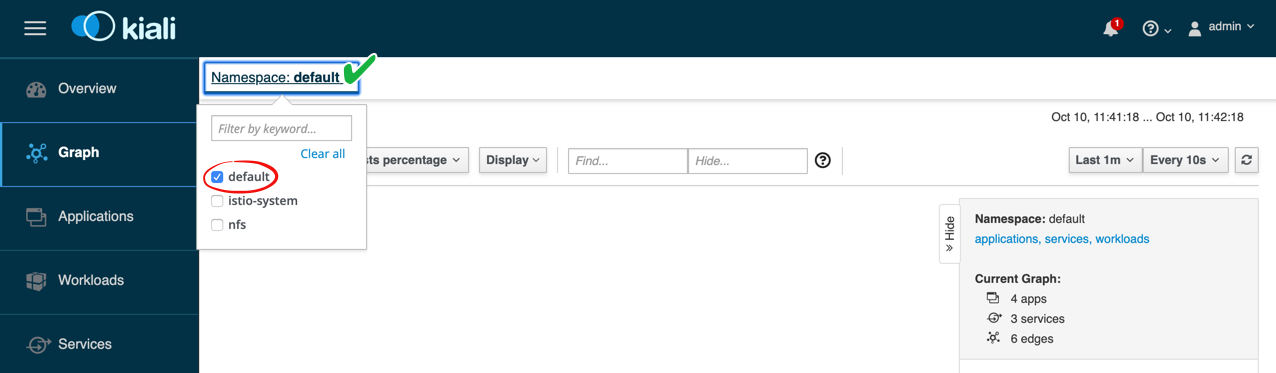
You may not see any active graphs yet; this is because no traffic is being generated in your services.
Let’s generate some traffic and observe the graph.
Step 9 Navigate back to your command line and run the following advanced traffic generation script:
$ AWSHOST=$(curl http://169.254.169.254/latest/meta-data/public-hostname)
$ while true; do curl $AWSHOST && sleep 0.5 && curl -A "Chrome" $AWSHOST; done
...
Step 10 Check your Kiali Graph view again. What do you observe? What can you tell about the Dog app vs Cat app? How much traffic is being sent to each one?
The presenter will go over the graph view in a bit more detail.
Congratulations! You have learned a (hopefully) new tool and features of Istio. If you have finished early, please wait for others and we will wrap-up the session.